Tuesday, July 31, 2012

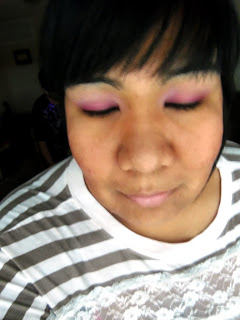
Pink Ombre Look

I must admit I'm addicted to the Ombre trend, I think it's super cool and although I don't have my hair or nails like that. I decided to incorporate that trend into my make-up look.

Products used on eyes:
  • Urban Decay Priming Potion
  • Sephora Pencil Liner in Black
  • NYX Jumbo Eye Pencil in Milk
  • BH Cosmetics 88 Matte Pallet (Black, Dark Pink,Medium Pink,and White)
  • Rimmel London Sexy Curves Mascara
Products Used on Face:
  • Elf Tinted Moisturizer
  • Elf Pressed Powder
  • Color Work Shop Blush and Contour
Products Used on Lips:
  • Nivea Lip Balm
Brushes Used:
  • Elf eye-shadow brush
  • Color Workshop Stippling Brush
  • Elf Contour Brush
  • Color Workshop Blush brush
Get the look:
  • Apply your face primer before you start to apply your eye-shadow primer that way it would have sunken into your skin and your will be ready for you to apply your foundation.
  • Apply an eye-shadow primer or if you don't have one apply a concealer and go over it with a bit of powder, in this case I've used the concealer and powder.
  • Take your pencil eyeliner and begin to line your top lid. Smudge ita bit.
  • Next apply a white base above the liner and try to prevent them from touching.
  • Using an eye-shadow brush apply a black eye-shadow on the liner.
  • Wipe off your brush and apply a dark pink above the black. Blend them together.
  • Next apply a medium to light color pink above the dark pink. Blend together. This color should be in the crease area. 
  • Now add a white eye-shadow and blend it into the pink.This can also be used as your highlight color as well.
  • Line your waterline and add mascara.
  • Next apply a powder to set in your foundation. I used the stippling brush for this.
  • Using a contour brush and elf bronzing powder begin to contour your face, place it in the hollows of your cheek, temples, both sides of your nose and along your jaw line. This of course is optional.
  • Apply a rosy pink blush to your cheeks.
  • For the lips I just used my lip balm.
http://www.youtube.com/watch?v=JBGbYNxz5Y8&feature=plcp

Wednesday, July 25, 2012

Influenster Summer VoxBox 2012


undefined

So a couple of weeks ago I was notified by Influenster that I was picked to review products for their Summer VoxBox. A week ago I recieved my box and I couldn't wait to open it. I received six products: Hawaiian Tropic Silk Hydration Lotion Sunscreen SPF30, Sally Hansen Magnetic Nail Color, Tampax and Always Radiant Collection, Sally Hansen Nails and Cuticles Hand Creme, Quaker Soft Baked Bar in Banana Nut Bread and Clear Scalp & Hair Beauty Therapy. I decided to test these products for a week starting with the day I got them. So without further to do I shall tell you guys what I think of them. :)


I shall start off with the Hawaiian Tropic Silk Hydration Lotion Sunscreen SPF30. The bottle I received is a 2 Fl. Oz bottle, the price for ,I'm guessing, a regular 6 Fl. Oz bottle is $8.99. I think for that price is pretty good considering that this sunscreen is a lotion as well and will definitely keep your skin hydrated as it protects you from the sun. I definitely must admit the best thing about this sunscreen lotion is the smell, I absolutely love it! It's not very strong if your one of those people who are picky about smells.This lotion Sunscreen has 12-hour moisturization when out in the sun. Overall I would say this is a good product, and if you don't believe me you should try it yourself. :)


Moving right along, the next product I'm about to discuss, I absolutely LOVED like love soooo much! This product is the Sally Hansen Magnetic Nail Color. The color I received is Silver Element, which is just well basically a silver color but it's absolutely gorgeous. I'm not gonna lie ever since I've received this nail polish I've been rocking it on my nails and gotten so many compliments on it. The only thing about this product that I don't like which I don't think it's a big deal but others might find it to be is that the designs aren't all consistent some are a lot more noticeable while some are barely noticeable. I don't know if maybe because I didn't hold the magnetic over the nail polish long enough but I shall continue to mess around with it to see if that's the case. However, I think it's actually cool since no nail is not really alike as least with the patterns. The cost for this nail polish is some what pricey if your on a budget, it's $9.99 but it's a lot cheaper than the one sold at Sephora which I believe is like $15. So, compared to that it's definitely a good price. I would recommend this product to every girl who loves trying something new on their nails, trust me you won't be disappointed.


Talking about Sally Hansen, I will tell you my thoughts on the Nails and Cuticles Hand Creme. Honestly, I have a love/hate kind of thing going on with this product. When I apply it, it makes my hands feel extremely soft and I love it but when I don't my hands feel really weird, I guess you can say like they are dry and this started happening after using this product.  However, I do like that this hand creme is good for  your nails it conditions them. It's Active moisture complex formula with ceramides helps to lock in nutrients so hands maintain their ideal moisture level. It last 24-hours, even after washing your hands. For a full size bottle of this lotion will cost you $5.99. I also will say that I do love the smell of this lotion, go figure :), it's a very faint citrus smell but if you're not found of fragrances like this than this isn't the product for you. All in all I would recommend this lotion to people just because it does so many good things for your hands.


The product I have a love/hate relationship with is the Tampax and Always Radiant Collection. This collection consist of tampons, pads, and liners that tailor to a women's need. This collections also consist of a cute pouch. I love that the pad wrappers are re-seal-able making it easier to "disguise" your period. The pad, when you open it, has an arrow telling you which way is the front which I think it's cool. Let's face it ladies we all have the moment when we don't know which way goes which. The only thing that I don't love about this collection is that the pads and I believe the liners consist of a scent. It smells pretty but I don't like that it's on the pad, I don't know it's just weird and plus it can cause your pH system in your vagina to change and that can cause you to get an infection. The price for this collection depends on the box.

This Quaker Soft Baked Bar in Banana Nut Bread is absolutely delicious, I love it. It is made with real bananas and almonds. It has 5g Fiber, 20% of daily value of 5 B vitamins and 6g of Proteins. I think these bars are ideal for everyone especially if you are trying to eat healthy or trying to find healthy snacks for your kids. This are $3.29 for a package of bars. I think it's totally work the price and I will definitely be buying me some.

The last and final products I received are the Clear Scalp & Hair Beauty Therapy shampoo and conditioner. These products are suppose to nourish the scalp and make your hair stronger in 7 days. My hair is very fragile and I've been wanting a shampoo and conditioner that will help make my hair stronger since I want to grow it out. And trust me when I say this product does do what it says my hair feels sooooo much stronger than it did before. I definitely love it! The price for them varies by size and there are two sizes a 12.7 oz and a 12.9 oz and price ranges between $4.99-$5.99. If your hair is fragile and could use some help I think you should  absolutely buy them. It's well worth the money.

*Disclosure: These products were sent to me from Influenster for testing purposes.

Tuesday, July 24, 2012

Colorful Classy Summer Look

I got inspired by my Tinker Bell Shirt & of course Tinker Bell herself, she is super classy, sassy and well one of my favorite disney characters!

Products used on eyes:
  • Elf eyelid primer
  • NYX Jumbo Eye Pencil in Milk
  • BH Cosmetics 88 Matte Pallet (Yellow, Green and a highlight color)
  • Sephora Flash Eyeliner in Black
  • Color Workshop Mascara
Products used for the face:
  • Hard Candy Sheer Envy Skin Perfecting Primer
  • Rimmel London Stay Matte Foundation
  • True blend Mineral Powder
  • Elf Bronzing Powder
  • A very light pink blush
Lips:
  • Color Workshop Red lip liner
  • Color Workshop Red Lipstick
Brushes Used:
  • Elf  Eye-shadow brush 
  • Angled Eye-shadow Brush
  • Color workshop Stippling/Blending Brush
  • Elf Contour brush
  • Color workshop blush brush
Get the look:
  • Apply your face primer before you start to apply your eye-shadow primer that way it would have sunken into your skin and your will be ready for you to apply your foundation.
  • Apply an eye-shadow primer or if you don't have one apply a concealer and go over it with a bit of powder, in this case I've used the concealer and powder.
  • Apply a white base to the middle of your lid and blend out.
  • Using a eye-shadow brush pat on a yellow color from the inner corner to the middle of your lid.
  • Wipe your brush, then apply a green color from the middle to the outer corner. Make  sure to blend the middle so that there is no harsh lines. 
  • Taking a crease brush blend the green into the crease.
  • Apply a highlight color to the brow bone.
  • Tight line your upper lid and line your waterline.
  • Add two coats of your favorite mascara. 
  • Using a stippling brush apply your foundation to your face.Blend it in and remember to put some on your neck.
  • Next apply a powder to set in your foundation. For this I used a mini kabuki brush.
  • Taking a contour brush and elf bronzing powder begin to contour your face, place it at the hollows of your cheek, temples, both sides of your nose (optional) and along your jaw line. This of course if optional and it will make your face appear slimmer.
  • Now using your blush brush begin to apply a blush to the apple of your cheeks.
  • Line your lips and fill them in. Then apply lipstick.
http://youtu.be/qQKS0WvrXXQ

Wednesday, July 11, 2012

Clubbing Look: Burgundy w/ Black cut crease


products used on eyes:
  • Elf eyelid primer
  • BH Cosmetics 88 Matte Pallet (Reddish-Brown and Black)
  • BH Cosmetics 120 Pallet 4th edition (Reddish-Brown)
  • Sephora Flash Eyeliner in Black
  • JLB Eyeliner in Black
  • Color Workshop Mascara
Products used for the face:
  • Hard Candy Sheer Envy Skin Perfecting Primer
  • Rimmel London Stay Matte Foundation
  • True blend Mineral Powder
  • Elf Bronzing Powder
  • A very light pink blush
Brushes Used:
  • Elf  Eye-shadow brush 
  • Angled Eye-shadow Brush
  • Color workshop Stippling/Blending Brush
  • Elf Contour brush
  • Color workshop blush brush
Get the look:
  • Apply your face primer before you start to apply your eye-shadow primer that way it would have sunken into your skin and your will be ready for you to apply your foundation.
  • Apply an eye-shadow primer or if you don't have one apply a concealer and go over it with a bit of powder, in this case I've used the concealer and powder.
  • Using an eye-shadow brush apply a shimmer reddish-brown to your lid. Make sure to pat it on.
  • Using the same brush apply a matte reddish-brown eye-shadow over the shimmer.
  • Next using the angled eye-shadow brush run it along a black eyeliner and begin to place from the outer corner to 1/3 of your crease.
  • Using a blending brush. blend black eye-shadow in the crease and take it a lit bit above the crease.
  • Next apply apply eyeliner to the base of your lases and line your waterline.
  • Apply a highlight to your brow bone.
  • Add Mascara, and false lashes if you desire.
  • Using a stippling brush apply your foundation to your face.Blend it in and remember to put some on your neck.
  • Next apply a powder to set in your foundation. For this I used a mini kabuki brush.
  • Taking a contour brush and elf bronzing powder begin to contour your face, place it at the hollows of your cheek, temples, both sides of your nose (optional) and along your jaw line. This of course if optional and it will make your face appear slimmer.
  • Now using your blush brush begin to apply a blush to the apple of your cheeks.

Friday, July 6, 2012

Bronze Eye


Products used for the eyes:
  • NYX Eye-shadow Base in skin-tone
  • BH Cosmetics 120 4th edition pallet (Bronze)
  • BH Cosmetics 88 Matte Pallet (Brown and a highlight color)
  • Wet n Wild Brown Eyeliner
  • Color Workshop Mascara
Products used for the face:
  • Hard Candy Sheer Envy Skin Perfecting Primer
  • Rimmel London Stay Matte Foundation
  • True blend Mineral Powder
  • Elf Bronzing Powder
  • A very light pink blush
Brushes Used:
  • Elf  Eye-shadow brush 
  • Angled Eye-shadow Brush
  • Color workshop Stippling/Blending Brush
  • Elf Contour brush
  • Color workshop blush brush
Get the look:
  • Apply your face primer before you start to apply your eye-shadow primer that way it would have sunken into your skin and your will be ready for you to apply your foundation.
  • Apply an eye-shadow primer or if you don't have one apply a concealer and go over it with a bit of powder, in this case I've used the concealer and powder.
  • Using an eye-shadow brush apply a shimmer bronze color to your eye-lid.
  • Taking a blending brush apply a dark matte brown into your crease and blend.
  • Next using an eye-shadow brush apply a matte bronze color over the shimmer.
  • Using an angled eye-shadow brush apply the matte bronze to your lower lash line, and use it to apply a brown eyeliner or brown eye-shadow to your top lash line.
  • Apply a highlight to your brow bone.
  • Add Mascara, and false lashes if you desire.
  • Using a stippling brush apply your foundation to your face.Blend it in and remember to put some on your neck.
  • Next apply a powder to set in your foundation. For this I used a mini kabuki brush.
  • Taking a contour brush and elf bronzing powder begin to contour your face, place it at the hollows of your cheek, temples, both sides of your nose (optional) and along your jaw line. This of course if optional and it will make your face appear slimmer.
  • Now using your blush brush begin to apply a blush to the apple of your cheeks.
Tutorial: http://www.youtube.com/watch?v=_qvKisxSAK4&feature=plcp