Sunday, July 28, 2013

Midnight Velvet Review/Giveaway


 Are you a lover of mineral makeup but can't seem to find a brand that has natural pigmented products? Well you are in luck, today I'm going to introduce you to Midnight Velvet. Midnight Velvet's makeup collection is called M. Vie, they're products have natural micronized mineral pigments including vitamin A& E infused with a lavender-based aromatherapy. You can also buy everything in this kit individually.
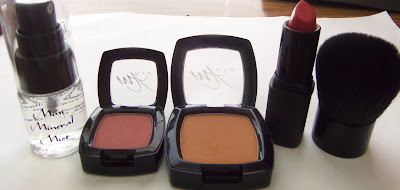


In their collection they have a Mineral Makeup Starter Kit, which I am going to be review for you. This kit has so many shades so you are bound to find a kit that matched your skin tone. I got mine in Med/Deep. The kit contains a powdered foundation, blush, lipstick, kabuki brush and mini mineral mist that come in a beautiful black lace makeup bag. Everything in the kit is designed to go with your shade. So if you are interested in learning more about these items and what I have to say then just keep reading. Also at the end of this post are the rules for a lovely giveaway.

Mineral Foundation Powder:


 "Less is really more with mineral makeup. Because we use all natural pigments instead of dyes, a little goes a long way. When you first apply the mineral foundation with the small kabuki brush it will look very sheer. But as it sits on your skin the color will develop. You need to give it a minute and you will start to see that beautiful, natural coverage. For fuller coverage repeat application and coverage will build."

This is my first time using a powder foundation. However, I used it with an open mind since I do love my liquid foundations. My skin at the moment is anything but perfect so after I applied this and waited I excepted to see nothing glamorous. When I looked into the mirror my skin was glowing but the coverage was light so I  applied a bit of concealer on my imperfections and went back in with another application and I loved the way my face looked. This foundation is very light weight and just looks so natural. I definitely am going to be replacing my tinted moisture for this during these summer days.

Small Kubuki Brush:

"This brush is designed with the finest hairs & specifically shaped to apply the foundation smoothly & evenly."
I love that this brush is so soft & dense. It definitely grabs the right amount of product, but I still love my Elf powder brush for applying powder. However, this brush is great for putting it in your purse for touch-ups throughout the day.

Blush:
                                       

"This product is very concentrated with high quality natural pigment. A little goes a long way"

The color I received is called Maple Leaf, it's like a reddish-brown color. I honestly didn't think I would like this color but I did ending up liking it. It's just so pretty once you apply it. Trust me all you need is a little bit these things are crazy pigmented but luckily they are so easy to blend out just in case you applied to much.

Lipstick:

"Our lipstick is a creamy formula infused with vitamin A & E designed to condition the lips. The lipstick contains a high quality pigment providing you with a beautiful long lasting lip color."


The color I received is called Persimmon. Looking at the lipstick it looks kind of pinkish-red with a hint of coral. The lipstick is super creamy, moisturizing and pigmented. When they say long lasting they mean it! You can drink with little to no transfer on your glass and as it fades it becomes a beautiful stain on your lips. This color is now one of my summer go-to lipsticks.

Mini Mineral Mist:
"Once your makeup is complete spray your entire face with the Mini Mineral Mist to set the makeup. Feel free to mist throughout the day to freshen your face and breathe in the lavender aromatherapy for a moment of relaxation."

When you spray this mist onto your face it gives you a lovely dewy look. It really does keep makeup in place, I can't tell you exactly for how many hours but enough to go out and run errands in this ridiculously hot weather. The only thing I don;t like is the smell you. When you spray you get a nose full of lavender and I didn't like it one bit. However once the mist disperse you can't smell anything.

So that is it for this review and now onto the give-away!!!! The winner will receive a $50 gift certificate to Midnight Velvet. They have amazing things, check out their website. This giveaway is for Us residents only. The giveaway will end August 26 at 11:59 pm Central .
Rules:
1. Must be subscribed to my youtube channel & subscriptions must be public.
2. Follow or Like Midnight Velvet on twitter or facebook. Do both for an extra entry.  
3. Follow or Like me on twitter or facebook. Do both for an extra entr
4. You must comment on this video telling me how you entered (One comment only)
Extra Entries:
1.Follow my blog: http://www.bloglovin.com/en/blog/5047681
2.Share this post..
3. Comment on this post telling me what kind of looks/posts you would like to see in the future


Disclosure: These products were sent to me for reviewing purposes only. These are my honest opinions. Midnight Velvet is sponsoring this give-away.

Thursday, July 25, 2013

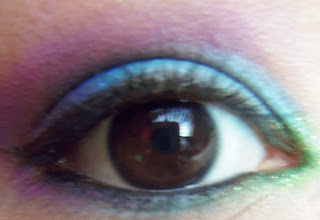
Mermaid Inspired

I hope you guys enjoy this fun look.


Products used on the eyes:
  • Urban Decay Potion Primer
  • NYX Jumbo Eye Pencil in Milk
  • BH Cosmetics 88 Matte Palette: Light Blue, Baby Blue, Blue, Lime Green, Green, Purple, White & Highlighter
  • 8 Bit Cosmetics Green Glitter
  • Essence Eyeliner in Scream Green
  • Wet n Wild eyeliner pencil in white
  • Hot Topic Glitter Eyerliner Pencil in black
  • Sephora Blockbuster Palette: Black Eyeliner
  • Elf Duo Mascara
Products used for the face:
  • Hard Candy Perfecting Primer
  • Elf Tinted Moisturizer in Sand
  • M. Vie Foundation Powder
  • Kat Von D Concealer
  • Sephora Big Mini Palette: Bronzer & Bllush
Products Used for the lips:

  • Wet n Wild Bare It All Lipstick
  • Elf Lip gloss in Sugar Cookie
Brushes Used:
  • BH Cosmetics Travel Brush Set: Shadow, Blending,  Angle shadow, Concealer & Angled Liner Brush
  • M. Vie Kabuki Brush
  • Color Workshop Contour brush
  • Color workshop blush brush
Get The Look:
  • Apply your face primer before you start to apply your eye-shadow primer that way it would have sunken into your skin and your will be ready for you to apply your foundation. 
  • Apply an eyeshadow primer or if you don't have one apply a concealer and go over it with a bit of powder.
  • I applied a white base all over my lid..
  • So to start off with the eyeshadow I applied a little bit of a light blue shadow in the inner corner going half way on the lid, then a blue that is a couple of shades darker next to, then a blue shade that is darker than blue the blues 1/3 on the lid and in the little space left on your eye had a light purple and then apply a dark purple on it going into the crease. Don't forget to BLEND!
  • I applied a green liner in the outer corner going 1/3 under my lower lashes and then for the rest I applied a white eyeliner. Don't forget to smudge it out.
  • I then weent over the green with a mixture of 2 light greens, then on half the the white eyeliner I used a light blue and the rest applied a light purple. Make sure to blend the colors. I also applied green glitter on the green just for fun.
  • Now apply a highlight under the brows. I used a skin tone eyeshadow.
  • Now line your eyes with a black eyeliner and then add some mascara. 
  • Using a kubuki brush apply your foundation to your face.Blend it in and remember to put some on your neck and conceal any imperfections.
  • Taking a contour brush and  bronzing powder begin to contour your face, place it at the hollows of your cheek, temples, both sides of your nose (optional) and along your jawline. This of course if optional and it will make your face appear slimmer.
  • Now using your blush brush begin to apply a peach blush to the apples of your cheeks. 
  • For the lips I wanted a nude pink lip, so I used my nude lipstick for wet n wild and went over it with a light pink lipstick.

Sunday, July 21, 2013

UV Wristbands

I'm always been a supporter of protecting your skin from harmful uv rays, especially during these hot summer days. Have you ever wondered how strong these rays are? No? Okay so I guess I'm the only one *sad face* but thanks to wristbands.net I no longer have to wonder I can know just by looking at my wristband.

These UV Wristbands are very unique and definitely super cool. They are originally appear clear and turn a blue/fuchsia color when exposed to ultra violet light. The higher the uv intensity the darker the wristbands will become. Did I mention you can customize these wristbands? Well you can!


This is definitely a fun and unique way to remind people how dangerous uv light is. These can help reduce skin cancer by simpling reminding you to apply sunscreen or just by simply staying in the shade. This has turned into my must have I have not left my house with my band and sunscreen in my purse for re-application later in the day.


If you are interested in learning more information check out their website. Let's have a safe summer and spread skin care awareness one band at a time. Also be sure to check out their social media: twitter & facebook


Disclosure: This is a sponsor post.  All opinions expressed in this post are my personal and honest opinions.

Wednesday, July 17, 2013

Flirty Party Makeup

So I've really been loving this color combination it has been my go-to look whenever I was going out or for a party. I love how it made my brown eyes pop and definitely received so many compliments on this look. 


Products used on the eyes:
  • Wet n Wild Take On The Day Eyeshadow Primer
  • Maybelline Color Tattoos: Gold Rush & Painted Purple
  • BH Cosmetics 120 Palette: Gold & Dark Purple
  • BH Cosmetics 88 Palette: Beige, Purple & Black
  • 8 Bit Cosmetics eyeshadow in Armature
  • Hot Topic Glitter Black Eyerliner Pencil
  • LA Colors Grafix Liquid Eyeliner in Black
  • Too Faced Lashgasm
  • Elf Duo Mascra
Products used for the face:
  • Smashbox Photo Ready Primer
  • Elf Tinted Moisturizer in Sand
  • Kat Von D Concealer in 
  • Cover Girl Professional Translucent Powder in 115 Translucent Medium
  • Klean Color Blush Palette: Pink Blush & Bronzer 
  • Maybelline Loose Powder in 01 Light (Highlight)
Products Used for the lips:
  • Wet n Wild Lipstick in Bare It All
  • BH Cosmetics Lip gloss in Studious
Brushes Used:
  • BH Cosmetics Double-ended Travel Brush Set: E/S,Angled E/S, Smudge, Concealer & Blending Brush
  • Color Workshop Blending Brush
  • Elf Stippling/Blending Brush
  •  Elf Contour brush
  • Color workshop blush brush
Get The Look:
  • Apply an eyeshadow primer or if you don't have one apply a concealer and go over it with a bit of powder.
  • I started off by applying a a gold base on half of my lid and on the other half I applied a purple base and used a blending brush to sweep it into my crease.
  • So to start off with the eyeshadow I applied a shimmer gold eyeshadow onto the base and taking a dark purple on the purple base and blended into my crease, both eyeshadows are from my 120 palette.
  • I then applied Armature which is a bronze-gold color onto the gold. 
  • Using my 88 Palette I applied a medium dark purple on top of the purple for a more intense look, don't forget to blend into the crease. 
  • Now taking a black eyeshadow and a smudge brush apply a little bit of black in the outer corner for some depth. Make sure to blend it out real good.
  • Using an angled brush I applied a Matte Beige eyeshadow on my brow bone .
  • I lined my upper lash line with a black liquid eyeliner and I winged it out and I tight-lined and lined my water line with a black eyeliner pencil.
  • Using the smudge brush, smudge some black along the lower lash line.
  • I used a small brush and applied the beige in the inner corner as a highlight.
  • Now add some mascara and the eyes are done.
  • Apply your face primer . 
  • Using a stippling brush apply your foundation to your face.Blend it in and remember to put some on your neck. Now apply concealer where needed.Next apply a powder to set in your foundation. For this I used the stippling brush.
  • Taking a contour brush and bronzing powder begin to contour your face, place it at the hollows of your cheek, temples, both sides of your nose (optional) and along your jawline. This of course if optional and it will make your face appear slimmer.
  • Now using your blush brush begin to apply a pink blush to the apples of your cheeks. 
  • For the lips I applied a nude lipstick and go over it with a light pink gloss.

Sunday, July 14, 2013

Nikki's Magic Wand Review

Hello my loves today I'm going be reviewing Nikki's Magic Wand. This is definitely a unique product and is so desperately needed for makeup lovers.


Here's what Nikki has to say about this tool.
" The sleek smooth flexible tip magically allows you to reach where normal applicators cannot, whether the tube is square, round, thick or thin, the wand allows you to reach the bottom, sides & shoulders of any tube so you can finally reach all you makeup." (From the box)


Let's be honest girl's, have you ever hated when you go to us your favorite lip gloss the applicator can't reach the rest and all you can do is stare at the last of you last of the product and then just throw it away. I know that is definitely my reason for not buying lip glosses any more.


Nikki has definitely answered very makeup junkie/artist's dream with this innovative tool that allows you to reach the last 15-20% of your makeup. The wand is a simple rubber tip it's very flexible and works like a squeegee. It's soft enough to apply any makeup directly to your face and it's so easy to clean. It comes in a stylish sleek tube.


This product is definitely a must have for every makeup lover. I love it, ever since I'v received it I've been using it for my lip gloss and I definitely have been spreading the word about this among my family and friend.
Have I sparked your interest about this product? If so check it out here. Also if you would like to gt in contact with Nikki here are here links: twitter  & facebook, and don't forget to tell her that I sent you.


That is it for this review and a huge thank you to Nikki for bringing this amazing product into my life! <3 I will talk to you guys soon, have a wonderful day.

Thursday, July 11, 2013

Olive Smoke

Hello my lovely angels today I'm doing sort of an olive-y smokey eye. I've been eyeing these two colors in my Color Workshop palette and decided to try to do something with them. I love the way this turned out and I hope you do too.


Products used on the eyes:
  • Elf Eyelid Primer 
  • NYX Jumbo Pencil in Milk
  • The Color Workshop (Moss, Sage, Black Out, Snow, Brown & Sandalwood)
  • Sephora Big Mini Palette (Khaki Green)
  • Wet n Wild Black & White Eyerliner Pencil
  • Elf Duo Mascara
Products used for the face:
  • Hard Candy Perfecting Primer
  • Elf Tinted Moisturizer in Sand
  • Rimmel London Hide the Blemish Concealer in 001Ivory
  • Cover Girl Professional Translucent Powder in 115 Translucent Medium
  • Elf Beauty on the go palette (Bronzer and peach blush)
  • Maybelline Loose Powder in 01 Light (Highlight)
Products Used for the lips:
  • Wet n Wild Lipstick in Barely There
  • BH Cosmetics Lipgloss in Studious
Brushes Used:
  • Elf Eyeshadow Brush
  • Elf crease brush
  • BH Cosmetics Smudger Brush
  • BH Cosmetics Concealer Brush
  • SOHO Blending Brush
  • SOHO Angled Liner Brush
  • Elf Stippling/Blending Brush
  • Color Workshop Contour brush
  • Color workshop blush brush
Get The Look:
  • Apply your face primer before you start to apply your eye-shadow primer that way it would have sunken into your skin and your will be ready for you to apply your foundation. 
  • Apply an eyeshadow primer or if you don't have one apply a concealer and go over it with a bit of powder.
  • I applied a white base all over my lid.
  • So to start off with the eyeshadow I applied a mixture of both sage and moss, olivey colors, all over the base.
  • Using a small blending brush I applied Brown into my crease and also blended it into the green.
  • I then used my smudger brush to apply black eyeshadow from the outer corner going into the crease, I used blackout. 
  • Using my SOHO Blending Brush I blended all the colors for a seamless transition.
  • Now apply a highlight under the brows and I used sandalwood which is a light brown color and in the inner corner, I used a white eyeliner and went over it with a white eyeshadow.
  • Now line your tight-lined and line my waterline with a black eyeliner and also used the liner to line my upper lash line and lower lash line. I went over the liner with black eyeshadow to smoke it out and then add some mascara. 
  • Using a stippling brush apply your foundation to your face.Blend it in and remember to put some on your neck. Next apply a powder to set in your foundation. For this I used the stippling brush.
  • Taking a contour brush begin to contour your face, place it at the hollows of your cheek, temples, both sides of your nose (optional) and along your jawline. This of course if optional and it will make your face appear slimmer.
  • Now using your blush brush begin to apply a peach blush to the apples of your cheeks. 
  • For the lips I applied a nude lipstick and went over it with a light pink gloss.

Wednesday, July 3, 2013

Perlier Italian sorbet Limone Refreshing crackling Ice Body water Review

With this insanely hot weather, I've found my must have summer product. It’s the Italian sorbet Limone Refreshing crackling Ice Body water from Perlier.


This is what Perlier has to say about this product:
Sparkling and crispy like a fruit sorbet. It moisturizes and refreshes in one step and turns your skin pleasantly smooth and scented. Ideal in the morning for a splash of “freezing “ energy or at night to remove tiredness and the heat of the day.


This product is so refreshing! It sprays in continuous foam. Then when you go to rub it into your skin it crackles, which is the cool part! The product does feel cold on your skin but if you want to make it colder you can put it in the refrigerator, which I haven’t tried yet. This is definitely a unique product & is perfect for summer especially when it’s crazy hot & you’re on the go. I've been carrying it in my purse to combat the heat!

If you are interested in this product check it out here and I also have a coupon code to use for a $5 off your order: iFabbo5