Wednesday, August 28, 2013

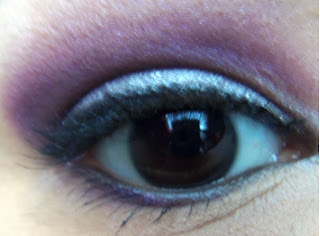
Sexy Going Out Makeup l RHWM Inspired

Hello my loves, so I finally got cable! I know your probably thinking what does that have to do with anything and I will tell you. One late night I couldn't sleep and I came across the Real House Wives of....Miami? I believe. Anyway, one of the chicks was rocking purple and black in the outer corner and I feel in love with it, So this look is somewhat inspired by her with my own twist on it of course. I hope you enjoy this as much as I do! :)


Products used on the eyes: 
  • Elf Eyelid Primer in Sheer
  • NYX Jumbo Eye Pencil in Milk
  • Milani Powder Eyeshadow in White Lie
  • 8 Bit Cosmetics: Knight in Shinning Kevlar & The Cat
  • Wet n Wild Eyeliner Pencil in Black
  • Sephora Block Buster Palette: Black Gel Liner
  • Sexy Curves Mascara
  • Sephora Big Mini Palette: Pale Pink
Products used for the face:
  • NYC Liquid Smooth Foundation
  • Wet n Wild Concealer Stick in Ivory
  • Covergirl Loose Powder in Medium
  • Maybelline Loose Powder in Light
  • Sephora Big Mini Palette: Bronzer & Peach Blush
Products Used for the lips:

  • Rimmel London Exaggerated Lip Liner in Red Diva
  • M.vie Lipstick: Poppy
  • Elf Super Glossy Lipshine in Candy Cane
Brushes Used:
  • The Color Workshop Shadow Brush
  • The Color Workshop Angled Shadow Brush
  • Soho Blending Brush
  • Soho Angled Liner Brush
  • Soho Beauty Sponge
  • Elf Contour brush
  • Color workshop blush brush
Get The Look:
  • Apply your face primer before you start to apply your eye-shadow primer that way it would have sunken into your skin and your will be ready for you to apply your foundation. 
  • Apply an eyeshadow primer or if you don't have one apply a concealer and go over it with a bit of powder.
  • I first applied a white base just to help increase the white eyeshadow we are going to be working with.
  • So to start off with the eyeshadow I applied a white eyeshadow and you are just going to take it up to the crease.
  • I then applied a matte black eyeshadow in the outer corner you are going to wing it out and blend it half way into the crease.
  • Now you are going to apply a matte purple eyeshadow around the black and make sure to blend the colors together.
  • Now apply a highlight under the brows. I used a pale pink eyeshadow.
  • I lined my upper lid with a black gelliner, tightlined using a black eyeliner pencil.
  • Using a beauty sponge I applied my foundation. Blend it in and remember to put some on your neck and conceal any imperfections.
  • Taking a contour brush and  bronzing powder begin to contour your face, place it at the hollows of your cheek, temples, both sides of your nose (optional) and along your jawline. This of course if optional and it will make your face appear slimmer.
  • Now using your blush brush begin to apply a peach blush to the apples of your cheeks. 
  • For the lips I went with a red lip. So I lined and filled in my lips, went over it with a red lipstick and add a bit of a shimmer red lipgloss in the center.

xoxo,
Tori

Sunday, August 25, 2013

Ageless Derma Anti-Aging Intensive Skin Brightener Review

 Hello my lovely angels today I am going to be reviewing the Ageless Derma Anti-Aging Intensive Skin Brightener. As a gal with a medium complexion my skin is going to be face hyper-pigmentation. So it is important to include a brightening cream into my skin regime.


 Here's what Ageless Derma has to say about this Face Brightening Cream:
            
             
             Ageless Derma Face Brightening Cream is an innovative new treatment that is clinically                      proven to reduce all types of hyper-pigmentation and leave you with soft glowing skin.


            Whether you are concerned by freckles, age spots, brown spots, liver spots or changes in skin                pigmentation caused by pregnancy or oral contraceptives, Ageless Derma Face Brightening              Cream has been specially formulated with an all new combination of natural and bio                             engineered ingredients to lighten skin without any harmful side effects.


          Ageless Derma Face Brightening Cream contains 7 revolutionary ingredients to provide fast               gentle and effective skin lightening for your skin.

 Let me start off by saying before I started using this product I had a couple of dark spots and post acne marks. My skin wasn't that bad but not good enough to where I wanted to walk out the house without anything on my face. Thanks to this product I know feel confident to walk out the house with nothing on my face.

 I've been using this product for almost two weeks and my face looks amazing! Although it's weird before I started using it. I had broke out and after a day my face had cleared up. I'm not sure if this product clears up acne as well but I'm loving it! I can honestly say this is the best my face has looked in a while.


 I give this product a perfect 10! If you are experiencing any hyper-pigmentation and are tired of it give this a try it will definitely change your face. If you are interested check out this this product here.


*Discloser: This product was sent to me for reviewing purposes. All opinions are my own honest thoughts. 

Monday, August 19, 2013

Hydroxatone AM/PM Anti-Wrinkle Complex

Hey my beautiful angels, today I am going to be reviewing the Hydroxatone AM/PM Anti-Wrinkle Complex. This is definitely going to be the quickest review ever.

This moisturizer can be used for both morning and night it contains an SPF of 15. You get 30 grams of product. The cream has a yellowish color to it and is thick. I find it difficult to spread onto my face and neck due to the consistency of it. However, once it absorbs into your skin it will feel so soft. This product is super moisturizing and I can’t tell you if it helps reduce wrinkles since I do not have any.

This is not my favorite moisturizer to use simply because it makes my face super oily and I already have very oily skin. However, I do think this product is ideal for someone with dry skin or someone with a little bit of an oily face.


Overall, I give this a 5/10. I would like it if my face didn’t end up unbearably oily. However, if you are interested in checking out this product head to your local ulta or go to here and read more about it yourself. #AntiWrinkleSPF

Wednesday, August 14, 2013

Back to school: Makeup & Hair

Need and easy yet glamorous look for school then your in luck! This look is perfect any grade level and you can intensify it to your liking. Good luck with this school year and I will have more school looks coming your way!!

Products used on the eyes: 
  • NYX Shadow Base in Skintone
  • The Color Workshop: Brick, Rust, Buff, Shimmer & Blackout
  • Wet n Wild Eyerliner Pencil in black
  • L.A Colors Eyeliner Pencil in Electric Blue
  • Elf Duo Mascara
Products used for the face:
  • Hydroxatone BB Cream in Medium
  • Wet n Wild Concealer Stick in Ivory
  • Covergirl Loose Powder in Medium
  • Maybelline Loose Powder in Light
  • Klean Color Make Me Blush Palette: Bronzer & Pink Blush
Products Used for the lips:

  • Maybelline Baby Lips in Pink Punch
  • L.A Colors Duo Lipstick in Lipgloss in Sensual
Brushes Used:
  • Elf Shadow Brush
  • The Color Workshop Angled Shadow Brush
  • Soho Blending Brush
  • Soho Angled Liner Brush
  • Elf Powderi Brush
  • Elf Contour brush
  • Color workshop blush brush
Get The Look:
  • Apply your face primer before you start to apply your eye-shadow primer that way it would have sunken into your skin and your will be ready for you to apply your foundation. 
  • Apply an eyeshadow primer or if you don't have one apply a concealer and go over it with a bit of powder.
  • So to start off with the eyeshadow I applied a brownish-red (Brick) into my crease using an angled shadow brush. I blended it out with a fluffy brush.
  • I then went over the shadow with an orange (rust) shadow just to make it pop. I blended it out.
  • Now I applied a white base onto my lid and blended it out with my finger.
  • I went over the base with an off-white shadow.
  • Now apply a highlight under the brows. I used a peach-tone called shimmer eyeshadow.
  • I lined my upper lid with a black shadow called blackout, tightlined using a black eyeliner pencil and applied a blue eyeliner to my waterline. 
  • Using a kubuki brush apply your bb cream to your face.Blend it in and remember to put some on your neck and conceal any imperfections.
  • Taking a contour brush and  bronzing powder begin to contour your face, place it at the hollows of your cheek, temples, both sides of your nose (optional) and along your jawline. This of course if optional and it will make your face appear slimmer.
  • Now using your blush brush begin to apply a pink blush to the apples of your cheeks. 
  • For the lips I wanted a.light pink to my lips and went over it with a glitter gloss.
For the hair I just made a side ponytail which I think is absolutely cute especially if you have ombre hair. :)

Sunday, August 11, 2013

2in1 Look: Day & Night

Hey Everyone I finally had time to work on this look this past weekend! I thought I would show y'all two looks in one post! Hope you enjoy I had some much fun coming up with the color combinations. <3
Day:


Products used on the eyes:
  • Elf Eyelid Primer
  • Sephora Big Mini Palette: White Gold, Bronze, Deep Burgandy, & Pale Pink
  • L. A Colors Grafix Liquid eyeliner in purple
  • Wet n Wild Eyerliner Pencil in black
  • L.A Colors Auto Eyeliner Pencil in Brown
  • Elf Duo Mascara
Products used for the face:
  • M. Vie Foundation Powder in Tawny
  • M.Vie Concealer in Deep
  • Elf Beauty On the GO palette: Bronzer & Blush
Products Used for the lips:

  • M.Vie Persimmon
Brushes Used:
  • BH Cosmetics Travel Brush Set: Shadow, Blending,  Angle shadow, Concealer & Angled Liner Brush
  • M. Vie Kabuki Brush
  • Elf Contour brush
  • Color workshop blush brush
Get The Look:
  • Apply your face primer before you start to apply your eye-shadow primer that way it would have sunken into your skin and your will be ready for you to apply your foundation. 
  • Apply an eyeshadow primer or if you don't have one apply a concealer and go over it with a bit of powder.
  • So to start off with the eyeshadow I applied a white gold shadow onto the lid.
  • Next apply a bronze color into the outer corner blending into the crease.
  • Using a crease brush I applied a deep burgandy color into the crease and blended it out using a fluffy brush.
  • For an inner corner highlight I used the same color that we used for the lid and also I smudged some of the deep burgandy color into my lower lashes.
  • Now apply a highlight under the brows. I used a pale pink eyeshadow.
  • I lined my upper lid with a purple eyeliner, tightlined using a black eyeliner pencil and applied a brown eyeliner to my waterline. 
  • Using a kubuki brush apply your foundation to your face.Blend it in and remember to put some on your neck and conceal any imperfections.
  • Taking a contour brush and  bronzing powder begin to contour your face, place it at the hollows of your cheek, temples, both sides of your nose (optional) and along your jawline. This of course if optional and it will make your face appear slimmer.
  • Now using your blush brush begin to apply a peach blush to the apples of your cheeks. 
  • For the lips I wanted a nude pink lip, so I used my nude lipstick for wet n wild and went over it with a reddish pink/coral lipstick.
Night Look:


Products used on the eyes:
  • Wet n Wild Take On The Day Eyeshadow Primer 
  • Milani Liquid'fye Eyeliner Pencil in Silver
  • BH Cosmetics 120 4th Edition Palette: Silver & Purple
  • Sephora Block Buster Palette: Light Brown, Purple, Black, White & Beige
  • L.A Colors Grafix Eyeliner in Black
  • Wet n Wild eyeliner pencil in black
  • Too Faced Lashgasm Mascara
Products used for the face:
  • Hard Candy Perfecting Primer
  • Elf Tinted Moisturizer in Sand
  • Covergirl Loose Powder in Medium
  • Kat Von D Concealer
  • Klean Color Blush Palette: Bronzer & Bllush
  • Maybelline Loose Powder in Light
Products Used for the lips:

  • L.A Colors Duo Lipstick & Lipgloss in Sensual
Brushes Used:
  • Elf Eyeshadow Brush
  • Elf Crease Brush
  • BH Cosmetics Double Ended Travel Brush Set: Angeled Shadow, Concealer, Lip & Flat Angeled
  • SOHO Blending Brush
  • Elf Powder Brush
  • Color workshop blush brush
Get The Look:
  • Apply your face primer before you start to apply your eye-shadow primer that way it would have sunken into your skin and your will be ready for you to apply your foundation. 
  • Apply an eyeshadow primer or if you don't have one apply a concealer and go over it with a bit of powder.
  • I started off by blending a light brown eyeshadow into my crease.
  • Then I applied a silver base all over my lid going up to my crease, and blended out using my finger.
  • I applied a shimmer silver eyeshadow over the base.
  • Using an angel eyeshaow brush I applied a shimmer purple eyeshadow in my crease blending into the silver. Then I went over it using a matte purple.
  • Using a crease brush I applied a black eyeshadow into the outer corner blending into the crease creating a cut-crease look. Then blend it out using a fluffy brush.
  • Now apply a highlight under the brows. I used a beige eyeshadow. For the inner corner I applied a white eyeshadow. I also applied a black and purple eyeshadow under the lower lash line.
  • Now line your eyes with a black eyeliner and then add some mascara. 
  • Using a kubuki brush apply your foundation to your face.Blend it in and remember to put some on your neck and conceal any imperfections.
  • Taking a contour brush and  bronzing powder begin to contour your face, place it at the hollows of your cheek, temples, both sides of your nose (optional) and along your jawline. This of course if optional and it will make your face appear slimmer.
  • Now using your blush brush begin to apply a peach blush to the apples of your cheeks. 
  • For the lips I applied a pink lipstick.

Friday, August 9, 2013

Too Faced Beauty Editor Darlings Review

 So around March I had went to Sephora to treat myself to an early birthday gift. I originally was going to buy the Too Faced Shadow Insurance but as I was walking towards the cashier I saw the Too Faced Editors Pick set for $19. Of course it was a no brainier of what to pick. The set included mini size products of the shadow insurance, lashgasm mascra, primed & poreless face primer, lip insurance and glamour gloss volumizing lip gloss in sexpot.


The Too Faced Shadow Insurance is one of the most talked about primer besides the Urban Decay Potion Primer. It has a very thin consistency and blends out very easily. It definitely gives shadows an extra boost and makes them appear more vibrant. However, staying power wise, it was not the primer for me. I can only get about 4 hours of wear before my shadows start creasing horribly. I’m super glad I didn't by the full size.


The lashgasm Mascara is definitely my favorite in this box! All I need is one coat to achieve amazing lashes! It doesn't clump, the wand helps separate and gives lashes that little extra oomph. I don’t know what I was doing without this mascara before but definitely glad it’s now in my life.


The Primed and Poreless face primer is my second favorite in this set. If you’re looking for a primer that gives you a flawless finish and reduces the looks of pores then this primer is for you. Even though the tube is small all you need is a little bit to achieve a flawless face. It glides on smoothly. I love how it looks alone or under my makeup.


The Lip Insurance Smoothing Anti-Feathering Lip Primer is suppose to help your lipstick last and reduce the look of lines on your lips. The reason I say suppose is because it doesn't do that. My lipstick doesn't last and it just dries out my lips horribly!!!! I even tried using it after exfoliating and I still got the same results. I definitely give it a 0 out of 10. 


Finally the last product in the set is the Glamour Gloss Volumizing Lip Gloss in Sexpot. I really love the color of this gloss it's a very dark pink. When applied it has a bit of color but it's more on the sheer side. It doesn't feel sticky on the lips like other glosses do and it has a tingly sensation which feels super cool! I don't really see a difference in my lips but honestly I could care less if it plumps my lips or not I just like the color. 


Even though I didn't like all the products in the set this was a great purchase. I got to try 5 products for the cost of 1. I think every company should have a top pick set.