Monday, January 27, 2014

DIY: Valentine's Day Room Decor

Hello my lovely angels!! Today I am going to show you some easy do it yourself room decorations ideas. I only did two projects and I love the way my room looks. I also have a video that shows you the steps instead you don't understood my written instructions, :)


Hanging Hearts:


So for this project you are going to need a couple of things: construction paper, yarn or string, glue, tape or a hot glue gun, and scissors.


* Now first your going to get the construction paper and begin to fold it. You can fold it portrait style for longer strips or landscape for smaller strips. I did a mixture of both. Your gonna fold it in half, then again, and until you can't anymore or your desired thickness.


* Now you are just going to cut the strips.

* You are going to get a strip add glue towards the bottom and fold over connecting the ends. You basically are going to do this to all the strips and this is going to create half of the heart.


* Then along the top you are going to add glue but don't do it all the way start from the bottom and go about half way. Then quickly apply the yarn or string over the glue.


* Finally you are just going to add glue on both sides of the string grab another half heart and apply it on the glue. Now you are just going to do this and add as many hearts to one string I added 3.


"I Love You" Banner

So for this project you are going to need: 3 white papers, colors, scissors, glue or sting and yarn.

* You are going to start by folding the papers in half.

* Then you are going to cut the papers in half, you are going to need 5 sheets.


* Now the fun part, on 3 of the papers you are going to draw a big heart and in them you are going to put "I love you" and on 2 sheets you can draw random things I drew a heart and a flower.


* Now you are just going to color everything.


* So to attach the papers to a string you are going to be working backwards. I add glue to the back of the paper that has "you" and quickly put the string over the glue. Then with however much space you want between these pictures I used the width of my hand you are going to put one of the random drawings, followed by the paper with "love", then the final random drawing and finally ending with "I".


Thursday, January 23, 2014

Valentine's Day: Neutral Eye

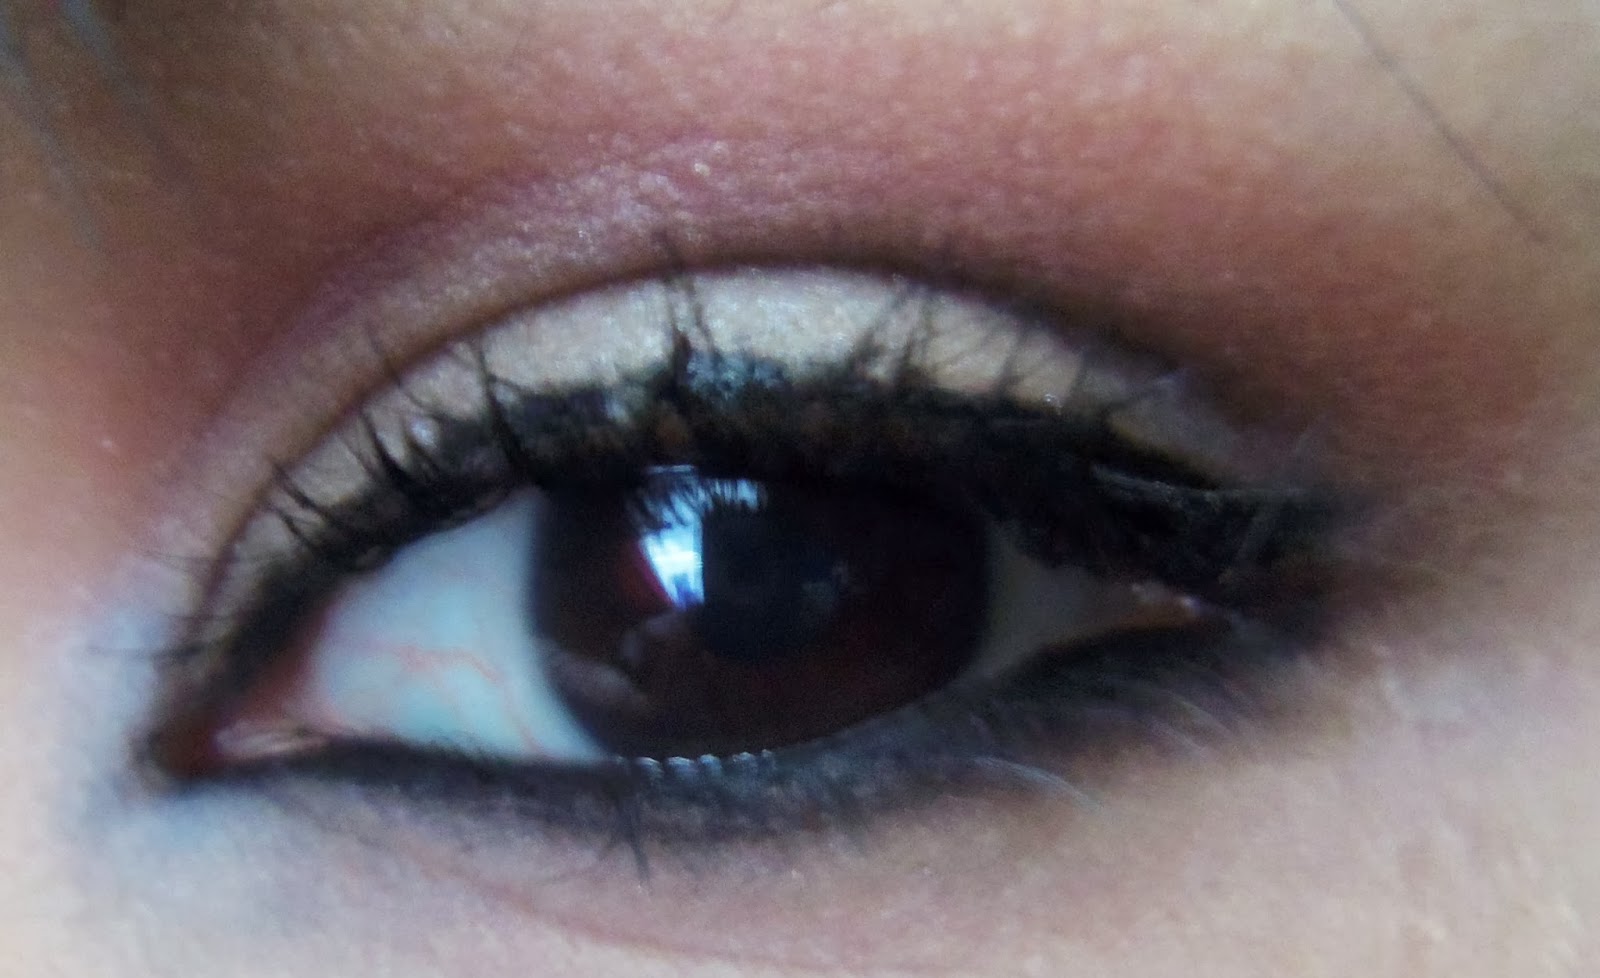
Hello my lovely angels! I know with the past holidays I totally didn't do many tutorials for them but with Valentine's Day coming up I decided to get the ball rolling! So within the next few weeks expect to see many Valentine theme videos!! I decided to start with a very girly look, it's some what neutral and I just love that it has the girly aspect to it. So if you would like to know how I did it be sure to keep reading, and of course there will be many pictures and don't forget to check out my video to watch me create this look! <3


Products Used:
  • Wet n Wild Take On The Day Eyeshadow Primer
  • Maybelline Color Tattoo in Too Cool
  • BH Cosmetics 1st edition palette: Brown, Off White, Red Brown, Matte Black, Light Yellow, White
  • NYX Jumbo Eye Pencil in Milk
  • Jordana 12 Hr Made To Last Liquid Eyeliner Pencil
  • LA Colors Graffix Liquid Eyeliner 
  • Wet n Wild Mega length Mascara 
Lip Products:
  • Wet n Wild Mega-last Lipstick in Just Peachy
  • BH Cosmetics Lipgloss in Studious
Brushes Used:
  • BH Cosmetics Smudge/Crease Brush
  • BH Cosmetics Blending Brush
  • Crown Chisel Shadow Brush
  • Crown Crease Blender
  • BH Cosmetics Mini Eyeshadow Brush
* So as always you are going to start off by applying an eyeshadow primer be sure to apply some to the lower lash-line as we will be putting shadow there too.

* Next apply a white base, I used my maybelline color tattoo in too cool.

* Now we are going to apply shadows. First you are going to apply a brown shade into the crease, this is going to help add depth as well as help blend out the colors we are going to apply later.

*  Next apply an off white color with a hint of a yellow shade onto the lid.

* Now apply a reddish brown shade into the crease blending into the brown. Also apply it under the lower lash line.

* Apply a little bit of black into the outer corner for a bit of depth and don't forget to blend it out.

* Taking a smaller brush apply a white base in the inner corner and then go over it with a white shadow.

* Now apply a highlight color under the brow.

* Now just line your eyes to your liking and apply mascara.

* For the lips I wanted to keep it girly so I used a peach lipstick and went over it with a pink lip gloss.


Monday, January 20, 2014

My foundation routine for a flawless face

Hello my lovely angels, today I'm going to be showing you how I achieve a flawless face using drugstore products. I have an oily face so hopefully this well help other girls who have an oily/combination face. I know how annoying it is when we apply our makeup looking hot and hours later we look like a hot oily mess. So allow me to show you have I do my foundation routine and share tips to help you look a like movie star through out the day.


Products used:

  • Too Faced Primed and Poreless face primer
  • Dollar Tree Milk of Magnesia
  • Revlon Color Stay liquid foundation Oily/Combination in 370 Toast Hale
  • Wet n Wild Coverall Concealer Stick
  • Elf Blot Sheets
  • Elf Pressed Powder in Honey
  • Bh Cosmetics Contour and Blush palette
Brushes Used:

  • BH Cosmetics Foundation Brush
  • Elf Powder Brush
  • BH Cosmetics Blush Brush
  • Elf Mini Stippling Brush
  • Crown Deluxe Contour Brush


*So starting off you are going to want to make sure you've washed your face and even apply some moisturizer! Yes, that's right you must moisturizer your face even if your face gets oily. I would suggest going with an oil-free moisturizer. 


*Now once your skin has soaked up that moisturizer, your going to want to apply a primer. I usually start off with applying a primer that helps minimize pores, I usually just apply the on my nose. Then I apply Milk of Magnesia all over the rest of my face using a foundation brush. Once the m.o.m has dried to a white mask that's when you're ready to apply your foundation.


*Now that your face is and primed and ready it's time to apply your foundation. I use the Revlon Color Stay Foundation in Toast Hale. I tap the bottle on my CLEAN hand and use a stippling brush ( Elf powder brush) to apply my foundation. I feel a stippling brush definitely gives an airbrush kind of effect and helps the face look flawless. Make sure to blend onto your neck and into your hairline.

*Now your just going to apply some concealer onto areas that need some coverage, I usually don't do that since this foundation does give an amazing coverage. However, I will use a lighter concealer to highlight under my eyes, down my nose, cupid's bow, chin and forehead. I blend it all out with my finger.

*Before you apply powder, this is probably like a really important step. You must, and I repeat must blot your face. This will help absorb excess oily from the foundation and concealer and this also helps makes your foundation last a lot longer! 

*Finally we are going to apply powder to the face. I usually use a small brush and my bh cosmetics contour and blush pallet and apply the second lightest color onto the areas where I highlighted. I then use a small stippling brush to apply face powder onto my face.

*Now to finish up the face just contour and add blush! :)

Ta-da we are finally done with our face! I love the way my face looks and I hope you like it too. Just because you have an oily face doesn't mean you can't look like a movie star, now go out there and show off your beauty to the world!! I love you guys and don't forget to check out my video to actually see how I do my foundation routine. So, until next time have a fanta-bulous day. Now for more pictures!!!


xoxo,
 Tori


Monday, January 13, 2014

What's to come for 2014

Hello my lovely angels!!!

I know it's been forever since I've written a blog post or anything. I've been a little active on my youtube channel and feel horrible for ignoring my blog. Anyways, during this little break I've been doing a lot of thinking about the future of this blog and my channel.

 When I started this blog a little over a year ago I wanted it to have a variety of different post not just tutorials or reviews. I've felt like I lost my focus and it saddens me. I really want to switch things up. So as I said I've been doing a lot of thinking, and I was thinking about doing some D.I.Y/craft posts (I absolutely love crafting and do it yourself projects), also start adding skincare things (even some of my favorite homemade mask, since I use those a lot too), hair posts(since this year one of my resolutions is to start styling my hair more) and one a month feature some of the things I crochet.

So those are my ideas of things to incorporate into this lovely blog of mine. I really want to show you guys different sides of me. I'm not all about just beauty, I'm a gal who loves anything that allows me to express myself. I promise to start posting more withing in the weeks to come. Right now I'm working on some pretty interesting posts. I love all you and thanks for sticking by me. I promise I won't disappoint and can't wait to show you guys some awesome things this year. If you have any request of what you would like to see let me know in the comments. I'll talk to you guys again soon!

xoxo,
Tori

Thursday, December 19, 2013

Crown Brush HD Set Review

Hello my lovely angels! I'm so sorry for being gone so long, right now I am staying in Houston and my laptop is currently getting fixed so I have to use my brother's computer. I have been so busy visiting with family members that I haven't had time to use the computer but during this time I have had time to test new products for you.


The crown HD cosmetic brush set with mirror, tweezers,and case are vegan friendly and perfect for applying high definition cosmetics: liquids, creams, and powder. The set contains six brushes which are made with high quality synthetic fiber.


The brushes in this set are a pro powder, tapered blush, deluxe contour, chisel shadow, crease blending and detail liner. The brushes are so soft and pick up the right amount of product. They apply effortlessly. Also you don't have to use high definition products if your like me and don't have any. These brushes make me feel like a covergirl.. not really but my makeup looks amazing!


My favorite brushes are everything except the powder brush. The pro powder brush is great but I always prefer a stippling brush if anything I wish that was included in this set. However, the brush is still good and this set is just awesome. I definitely must rate it a must have.


Always remember when it comes to apply makeup having the right tools is what helps you achieve that flawless/glamorous look. So brushes are definitely really important! This set is perfect for beginners or pros. Also did I mention that this set comes in three different colors? You can get it in white with blue bristles, purple or orange. This set retails for $27.95 and is on sale for $16.77.  For more information or just to look at the sets be sure to click here.


*Disclosure: This product was sent to me by iFabbo for reviewing purposes this is my honest opinion.


Monday, November 25, 2013

Changing Leaves

Hello my lovely angels I'm back with a fall inspired look. It's now starting to feel and look like fall in South Texas so I decided to do a look inspired by the colors around me. This would also be perfect to wear on Thanksgiving.


Products used on the eyes: 
  • Elf Eyelid Primer in Sheer
  • NYX Jumbo Eye Pencil in Milk
  • Profusion Twinkle Twinkle Palette in 01 Yellow & Blue
  • Sephora Block Buster Collection Palette Orange, Black, Glitter Yellow Top Coat, Light Brown, Flesh-tone and White
  • Wet n Wild Eyeliner Pencil in Black
  • Beauty Treats Waterproof  Mascara
Products used for the face:
  • Hard Candy Perfecting Primer
  • Elf Tinted Moisutrizer in Beige
  • Wet n Wild Concealer Stick in Ivory
  • Covergirl Loose Powder in Medium
  • Maybelline Loose Powder in Light
  • Klean Color Make Me Blush Palette: Bronzer, Mauve Blush and Highlight
Products Used for the lips:
I just used a dark pink.

Brushes Used:
  • Elf Shadow Brush
  • SOHO Blending Brush
  • Elf Crease Brush
  • Elf Powder Brush
  • Elf Contour brush
  • Color workshop blush brush
  • Color Workshop Lip liner
Get The Look:
  • Apply your face primer before you start to apply your eye-shadow primer that way it would have sunken into your skin and your will be ready for you to apply your foundation. 
  • Apply an eyeshadow primer or if you don't have one apply a concealer and go over it with a bit of powder.
  • I applied a white base, even though the colors were already bright I just wanted them to pop a little more.
  • So to start off with the eyeshadow I applied a yellow shadow all over the lid. 
  • From the middle to the outer corner of the lid apply a orange eyeshadow and blend into the yellow. You're also going to take this into the crease. 
  • I then applied a black shadow into the outing corner blending into the crease. 
  • I also applied a light brown on top of the orange.
  • Now taking a fluffy brush blend the colors together.
  • Now apply a highlight under the brows, I used a flesh tone eyeshadow and apply a white in the inner corner.
  • I tight lined using a black eyeliner pencil.
  • I applied a coat of my favorite mascara.
  • Using a stippling brush I applied my tinted moisturizer. Blend it in and remember to put some on your neck and conceal any imperfections.
  • Taking a contour brush and  bronzing powder begin to contour your face, place it at the hollows of your cheek, temples, both sides of your nose (optional) and along your jawline. This of course if optional and it will make your face appear slimmer.
  • Now using your blush brush begin to apply a mauve blush to the apples of your cheeks. 
  • For the lips I went with a dark pink lipstick. 

Tuesday, November 19, 2013

Perlier Imperial Honey Body Butter Review

Hello my lovely angels! I feel like I haven't posted anything in forever especially a review! So with that being said today I am going to be reviewing the Imperial Body Butter by Imperial.


This body butter is different from others it was made from the honey of Black Bees, sounds cool right? Here's what Perlier has to say about this honey-tastic body butter:

This marvelous melting body butter from the rare honey of Black Bees, combined with Royal Jelly is a true beauty formulation. It nourishes the skin with moisture, leaving it pleasantly scented with the sensual notes of Honey and Oriental woods. Perfect to moisturize skin in the harsh winter and summer months.

I have tried body butters before I could never find one that really became my go to. So when I received this one I thought it was just going to be like the rest but oh my gosh I have fallen in LOVE with it! It smells incredible, I sometimes open the jar just to smell it, is that weird? As far as moisture it's amazing! I have very dry skin in the winter or when ever we get cold fronts my skin just gets disgustingly dry. When I received this we were going through a cold front so I applied some and instantly I could feel my skin sucking up the awesomeness of this body butter. My skin felt oh so soft and I thought I would have to reapply this an hour or two later but I didn't my skin still felt moisturized. Also, it does have a thick consistency but it's very easy to blend out and all you need is a little. This body butter is absolutely awesome and has became a must have in my skin routine as we face winter.

Also, can I just say how cute the packing is? I know it's really simple but it's such an eye-catcher and I love the gold lid it's so shiny and pretty.

Well guys and gals this is it for this review. If you are interested in this product or just what to read more click here. Also, type iFabbo5 to get $5 off your purchase. Thank you so much for reading and I hope you have a super fan-ta-bulous day!!!
xoxo,
Tori

Thursday, November 14, 2013

Red Hot Smokey Eye


Products used on the eyes: 
  • Elf Eyelid Primer
  • BH Cosmetics 120 Palette: Red, Black, & Silver
  • BH Cosmetics 88 Matte Palette: Red, Black, Silver & Flesh Tone Color
  • HotTopicGlitter Eyeliner Pencil in Black
  • Wet n Wild Liquid Eyeliner in Black
  • Elf Duo Mascara
Products used for the face:
  • Hard Candy Perfecting Primer
  • Elf Tinted Moisutrizer in Beige
  • Wet n Wild Concealer Stick in Ivory
  • Covergirl Loose Powder in Medium
  • Maybelline Loose Powder in Light
  • Elf Beauty on the Go Palette: Bronzer & Peach Blush
Products Used for the lips:
  • Wet n Wild Lipstick in Bare It All
  • New York City Liquid Lipshine in Nude York City
Brushes Used:
  • Elf Shadow Brush
  • SOHO Blending Brush
  • Elf Crease Brush
  • Elf Powder Brush
  • Elf Contour brush
  • Color workshop blush brush
  • Color Workshop Lip liner
Get The Look:
  • Apply your face primer before you start to apply your eye-shadow primer that way it would have sunken into your skin and your will be ready for you to apply your foundation. 
  • Apply an eyeshadow primer or if you don't have one apply a concealer and go over it with a bit of powder.
  • So to start off with the eyeshadow I applied a black eyeshadow in the inner corner and outer corner, make sure to apply some in the crease connecting the black. Be sure to leave a space in the middle
  • In the middle of the lid apply a red eyeshadow and blend into the black. 
  • I then applied a silver shadow above the crease to blend it out.
  • Now taking a fluffy brush blend the colors together.
  • I applied matte colors over the colors on my lid to help keep them in place and make it pop.
  • Now apply a highlight under the brows. I used a flesh tone eyeshadow.
  • I lined my upper lid with a black liquid liner, tight lined using a black eyeliner pencil.
  • I applied a coat of my favorite mascara.
  • Using a stippling brush I applied my tinted moisturizer. Blend it in and remember to put some on your neck and conceal any imperfections.
  • Taking a contour brush and  bronzing powder begin to contour your face, place it at the hollows of your cheek, temples, both sides of your nose (optional) and along your jawline. This of course if optional and it will make your face appear slimmer.
  • Now using your blush brush begin to apply a peach blush to the apples of your cheeks. 
  • For the lips I went with a nude lipstick to keep the focus on the eyes.

Monday, November 11, 2013

Dramatic Fall Makeup

Hello my lovely angels, I'm finally back with another blog post and a makeup tutorial that is awesome for fall. I will definitely be post more things!! :) 


Products used on the eyes: 
  • Elf Eyelid Primer
  • Sephora Block Buster Palette: Bronze Creme 
  • BH Cosmetics 120 Palette: Peach, Burgandy, Lavender
  • BH Cosmetics 88 Matte Palette: Peach, Light Purple& Flesh Tone Color
  • Sephora Big Mini Palette: Wine 
  • Wet n Wild Eyeliner Pencil in Black
  • Wet n Wild Liquid Eyeliner in Black
  • Beauty Treats Perfect Waterproof Mascara
Products used for the face:
  • Hard Candy Perfecting Primer
  • Elf Tinted Moisutrizer in Beige
  • Wet n Wild Concealer Stick in Ivory
  • Covergirl Loose Powder in Medium
  • Maybelline Loose Powder in Light
  • Sephora Big Mini Palette: Bronzer & Pink Blush
Products Used for the lips:
  • Color Workshop Lip Liner in Red
  • Color Workshop Lipstick in Dark Red
Brushes Used:
  • Elf Shadow Brush
  • SOHO Blending Brush
  • Elf Crease Brush
  • Elf Powder Brush
  • Elf Contour brush
  • Color workshop blush brush
  • Color Workshop Lip liner
Get The Look:
  • Apply your face primer before you start to apply your eye-shadow primer that way it would have sunken into your skin and your will be ready for you to apply your foundation. 
  • Apply an eyeshadow primer or if you don't have one apply a concealer and go over it with a bit of powder.
  • I first applied a bronze base to help make the colors pop a bit more.
  • So to start off with the eyeshadow I applied a peach eyeshadow on the lid.
  • I then applied a burgandy eyeshadow in the crease. 
  • I then applied a lavender shadow above the crease to blend it out.
  • Now taking a fluffy brush blend the colors together.
  • I applied matte colors over the colors on my lid to help keep them in place and make it pop.
  • Now apply a highlight under the brows. I used a flesh tone eyeshadow.
  • I lined my upper lid with a black liquid liner, tight lined using a black eyeliner pencil.
  • I applied a coat of my favorite mascara.
  • Using a stippling brush I applied my tinted moisturizer. Blend it in and remember to put some on your neck and conceal any imperfections.
  • Taking a contour brush and  bronzing powder begin to contour your face, place it at the hollows of your cheek, temples, both sides of your nose (optional) and along your jawline. This of course if optional and it will make your face appear slimmer.
  • Now using your blush brush begin to apply a peach blush to the apples of your cheeks. 
  • For the lips I filled them in with a red lip liner and I applied a dark red lipstick.


Friday, October 18, 2013

Fight Like A Girl: A Makeup Tutorial

 Hello my lovely angels today I am doing a look that is inspired by Breast Cancer Awareness so you can expect to see a lot of pink. This month is truly important to me as I had lost my grandma to breast cancer when I was 14. Ever since then I had helped spread the word about how important monthly self examinations are and getting your mammograms done. If you need more information about breast cancer and steps to take if you have it check out this website. Also I would like to dedicate this post to people who are fighting cancer or to people who have lost their lives to this horrible disease.


Products used on the eyes: 
  • Urban Decay Potion Primer
  • NYX Jumbo Eye Pencil  in Milk
  • LA Colors Artist Eye Palette: White & Hot Pink
  • BH Cosmetics 88 Matte Palette: Light Pink, Hot Pink & Flesh Tone Color
  • Profusion Twinkle Twinkle Palette in 04: Light Pink
  • Wet n Wild Eyeliner Pencil in Black
  • Wet n Wild Liquid Eyeliner in Black
  • Beauty Treats Perfect Waterproof Mascara
Products used for the face:
  • Hard Candy Perfecting Primer
  • Elf Tinted Moisutrizer in Beige
  • Wet n Wild Concealer Stick in Ivory
  • Covergirl Loose Powder in Medium
  • Maybelline Loose Powder in Light
  • Klean Color Make Me Blush Palette: Bronzer & Pink Blush
Products Used for the lips:
  • Cherimoya Eye/Lip Pencil in Pink Glitterati
  • NYX Round Lipstick in Strawberry Milk
Brushes Used:
  • Elf Shadow Brush
  • BHCosmetics Double Ended Travel Brush Set Brush: Fluffy Blending Brush & Lip Brush
  • Elf Crease Brush
  • Elf Powder Brush
  • Elf Contour brush
  • Color workshop blush brush
Get The Look:
  • Apply your face primer before you start to apply your eye-shadow primer that way it would have sunken into your skin and your will be ready for you to apply your foundation. 
  • Apply an eyeshadow primer or if you don't have one apply a concealer and go over it with a bit of powder.
  • I first applied a white base to help make the colors pop a bit more.
  • So to start off with the eyeshadow I applied a white eyeshadow on 1/3 the lid.
  • I then applied a light pink eyeshadow in the middle of the lid. I used to different light pinks.
  • I then applied a hot pink shadow in the outer corner working it into the crease. I used to different hot pinks.
  • Now taking a fluffy brush blend the colors together.
  • Now apply a highlight under the brows. I used a flesh tone eyeshadow.
  • I lined my upper lid with a black liquid liner, tight lined using a black eyeliner pencil.
  • I applied a coat of my favorite mascaras.
  • Using a stippling brush I applied my tinted moisturizer. Blend it in and remember to put some on your neck and conceal any imperfections.
  • Taking a contour brush and  bronzing powder begin to contour your face, place it at the hollows of your cheek, temples, both sides of your nose (optional) and along your jawline. This of course if optional and it will make your face appear slimmer.
  • Now using your blush brush begin to apply a pink blush to the apples of your cheeks. 
  • For the lips I filled them in with a light pink lip liner and I applied a light pink lipstick.

Monday, October 14, 2013

Living Dead Girl

Hey everyone I know I haven't posted in a while but I'm back with a Halloween tutorial! I'm super excited since this is my first one of the year. I have a lot more planned.


Products used on the eyes: 
  • Urban Decay Potion Primer
  • NYX Jumbo Pencil in Milk
  • NYX Mellow Yellow
  • BH Cosmetics 88 Matte Palette: White, Olive, Yellow & Flesh Tone Color
  • Wet n Wild Liquid Eyeliner
  • Wet n Wild Eyeliner Pencil in Black
  • Beauty Treats Waterproof Mascara
Products used for the face:
  • Hard Candy Perfecting Primer
  • Fantasy Markers by Wet n Wild Painters Palette (Femme Fatale) : White & Black
  • BH Cosmetics 88 Matte Palette: Mint, Blue & Black
Products Used for the lips:
  • The Color Workshop Lip Liner in Red
  • Kat Von D Foiled Lipstick in FTW
Brushes Used:
  • Color Workshop Shadow Brush
  • Color Workshop Lip Liner
  • Color Workshop Foundation Brush
  • Elf Crease Brush
  • Elf "C" Brush
  • Soho Blending Brush
  • Elf Foundation Brush
Get The Look:
  • Apply your face primer before you start to apply your eye-shadow primer that way it would have sunken into your skin and your will be ready for you to apply your foundation. 
  • Apply an eyeshadow primer or if you don't have one apply a concealer and go over it with a bit of powder.
  • I first applied a white base on my lid.
  • So to start off with the eyeshadow I applied a white eyeshadow onto my lid.
  • Using a crease brush I applied an olive eyeshadow into the crease. Blending it out.
  • I then applied a yellow shadow on top of the olive shadow blending into it.
  • Now apply a highlight under the brows. I used a flesh tone eyeshadow.
  • Now for the fun part, I applied some lash glue over the lid and then applied green glitter once it became tacky.
  • I added some yellow onto the inner corner blending into the green.
  • I lined under my lower lash line with a black eyeliner pencil and went over it with a black shadow. Make sure to add a lot you want that raccoon look.
  • I lined my upper lid with a black liquid liner, tight lined using a black eyeliner pencil.
  • I applied a coat of my favorite mascaras.
  • Using a foundation brush I applied a white cream all over my face and neck.
  • I then applied a mint shadow all over my face and neck.
  • Using a blending brush I applied a blue shadow onto the hollows of my cheeks, along my hairline and along the sides of my nose. 
  • Using a black cream I began drawing lines under my eyes and all over my face.
  • Now line your lips and fill them in. I used a dark red lipstick and went around my lips with a black eyeliner and blended it out.